So when looking further into my reference photos of Hynek, I was able to find 2 great images for the front and side of his face.
Like the front view of the body, I had to mirror the image of his face in photoshop to get absolute symmetry for modeling. So I continued to bring these images into my project folder and into a 'head' scene.
Wednesday, April 13, 2011
EDW - Source
So my hombre Anthony Castaneda helped me find an awesome source of information that will be of great use for modeling my humanoid. This artists website has many cool sights, but in one of the pages there are several good tutorials on modeling humanoid-based parts (ie hands, ears, torso etc).
http://www.erraticimagery.com/
http://www.erraticimagery.com/extras/tuts.html
http://www.erraticimagery.com/
http://www.erraticimagery.com/extras/tuts.html
EDW - Reference Photos
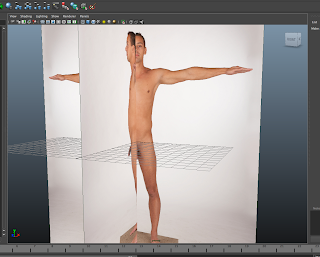
So after gaining permsission to be able to use some reference photos from low-poly modelling from last quarter, I began processing them in photoshop. From the person named Hynek, I have a folder with about 200 reference pictures. From these, I found 2 that I could use for my orthographic views in Maya:
From here, I brought the frontal view into photoshop and mirrored it over itself.
From here, I brought the frontal view into photoshop and mirrored it over itself.
Thursday, April 7, 2011
Intro to Production Pipeline - WIP
So today I delved into Mudbox's abilities to paint on the HQ mesh for my model... In particular I was able to make several layers of paint for my cuirass and combine them into a single image map. From there, I brought it into Maya and applied it to the Shader that had the normal map. I feel that it emphasizes the musculature of the breastplate far more than just having the normal map.
Here is my process:
Here is my process:
Wednesday, April 6, 2011
Demo at GDC - Vector Displacement Mapping
So while at GDC, Autodesk was showcasing a technology (completely unfamiliar to me) that really caught my eye - vector displacement mapping.
(Note: the vector map is a HDR image, so the full range can't be displayed properly)
On the left, you can see that it's obviously just a regular displacement map, but on the right we see something much different. This unfamiliar map further calculates the 'displaced' geometry by using the high-res model's UV coordinates along with the low-res to create a correspondence between the two.
"This correspondence allows the map to encode not only how far away one vertex is from the nearest vertex on the other mesh, but also to move the vertex across all three axes in space. This allows the map to encode complex undercuts, for example under a mushroom cap or behind an ear."
Here's a video: http://www.youtube.com/watch?v=ZPezIU0c4zc
Tuesday, April 5, 2011
Lastest Work - 3DDG Rendering
So I always used to have this habit in middle school where I drew this figure with a huge nose peeking over the edge of a table; it was quite addicting. After several hours of brainstorming for my toon-shading/paint effects assignment for Rendering, I decided to try it out once again, but this time in 3D of course!
Any Feedback? As a slight detail, I decided to make his skin all warm colors EXCEPT where it's brightest - it's a very very bright blue.
Any Feedback? As a slight detail, I decided to make his skin all warm colors EXCEPT where it's brightest - it's a very very bright blue.
Monday, April 4, 2011
EDW - cont.
Further looking around for sources to be used for this endeavor, I found an extremely reputable tutorial for modeling the human head, something that I'm quite wary about.
http://www.youtube.com/watch?v=xls25e08sSg
What I like most about this tutorial is how efficient the process is. The instructor only adds additional geometry where it's necessary while retaining a very accurate anatomical shape. Brilliant!
http://www.youtube.com/watch?v=xls25e08sSg
What I like most about this tutorial is how efficient the process is. The instructor only adds additional geometry where it's necessary while retaining a very accurate anatomical shape. Brilliant!
Subscribe to:
Posts (Atom)


